“Optimizing Your Azure Virtual Desktop with Dynamic Autoscaling”
Optimizing Azure Virtual Desktop and at the same time be as cost-effective as possible requires planning of usage and resources. Azure Virtual Desktop (AVD) offers a powerful feature called Autoscale that helps you optimize your virtual desktop environment by automatically scaling your session host virtual machines (VMs) up or down based on demand. This not only ensures optimal performance but also helps in reducing costs.
What is Autoscale?
Autoscale in Azure Virtual Desktop allows you to manage the power state of your session host VMs in a host pool according to a predefined schedule. This means you can automatically adjust the number of active VMs to match user demand, ensuring that you have enough resources during peak times and saving costs during off-peak hours.
Types of Autoscaling Methods
Azure Virtual Desktop offers two types of autoscaling methods:
- Power Management Autoscaling: This method powers on and off session hosts to adjust to the available capacity in a host pool. It’s ideal for environments where the number of users and their activity levels are relatively predictable.
- Dynamic Autoscaling (Preview): This method not only powers on and off session hosts but also creates and deletes session hosts as needed. It’s designed for more dynamic environments where user demand can fluctuate significantly.
Today I want to focus on the Dynamic Autoscaling feature that is currently in preview.
Microsoft documentation states the following prerequisites to use a dynamic scaling plan (preview):
- Dynamic autoscaling can only be used for pooled host pools with session host configuration. If you want to apply a autoscaling plan to a standard host pool without session host configuration, you need to use the power management scaling method, which is already generally available.
Azure Academy have a great video explaining how to enable your subscription to support this type of configuration: https://www.youtube.com/watch?v=ZW9tleDFIs8

- You can’t use dynamic scaling in conjunction with any other scaling script on the same host pool. You must use one or the other.
- Scaling plan configuration data must be stored in the same region as the host pool configuration. You can deploy session hosts in any Azure region.
- When using autoscale for pooled host pools, you must have a set custom max session limit for load balancing of that host pool. Don’t use the default value. For more information, see Configure host pool load balancing.
- You must grant Azure Virtual Desktop access to manage the power state of your session host VMs. You must have the Microsoft.Authorization/roleAssignments/write permission on your subscriptions in order to assign the role-based access control (RBAC) role for the Azure Virtual Desktop service principal on those subscriptions. This is part of User Access Administrator and Owner built in roles.
- Dynamic autoscaling currently requires access to the public Azure Storage endpoint wvdhpustgr0prod.blob.core.windows.net to deploy the RDAgent when creating session hosts. Until this is migrated to a required endpoint for Azure Virtual Desktop, session hosts that can’t access wvdhpustgr0prod.blob.core.windows.net will fail with a “CustomerVmNoAccessToDeploymentPackageException” error.
- If you’re using PowerShell to create and assign your scaling plan, you need module Az.DesktopVirtualization version 4.2.0 or later.
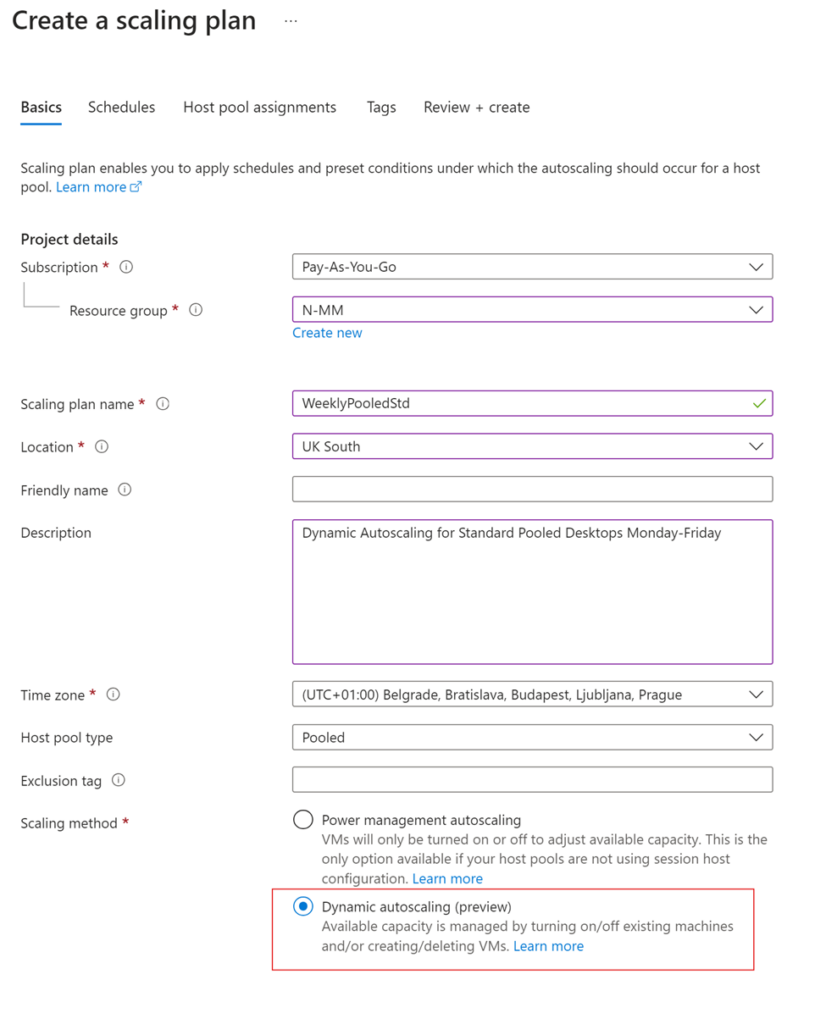
Configuring Dynamic Autoscaling is straightforward in the Azure Portal.
- Select Azure Virtual Desktop and you then select Scaling plans.

2. Click Create in the top left corner.

3. Fill out required information to create a scaling plan and choose the new option at the bottom of the page “Dynamic autoscaling (preview)“.

4. Klikk Next to enter the Schedule tab and Add a Schedule.

5. Here you will enter the configurations for your new schedule.
In the General tab you will assign a name, and what days the schedule should be enabled.
You will also specify % of minimum active percentage of hosts in the hostpools to be active and min/max hosts in pool.

6. At he Ramp-up tab you define when to start preparing VMs for peak business hours.
You will choose start time, Load balancing algorithm breadth-first (sessions equally spread on available hosts) or depth-first (fill one host with allowed sessions defined in the host pool before moving to the next host)
Capacity threshold is the value of percentage of used host pool capacity that will be considered to evaluate whether to turn on/off virtual machines during the ramp-up and peak hours.
For example, if capacity threshold is specified as 60% and your total host pool capacity is 100 sessions, autoscale will turn on additional session hosts once the host pool exceeds a load of 60 sessions.
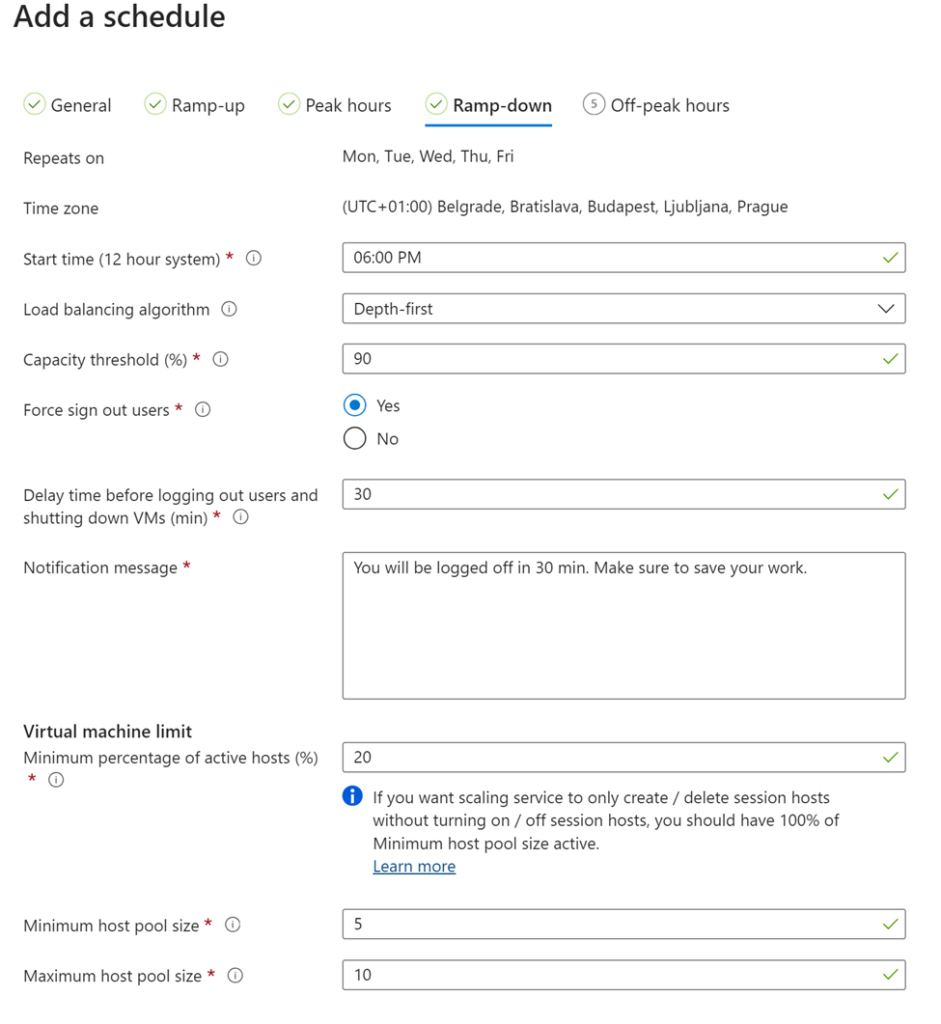
Virtual Machine limit is the percentage of minimum number of running session host VMs based on the ‘Minimum host pool size’ that are always available. E.g. if ‘Minimum percentage of active hosts (%)’ is specified as 10 and ‘Minimum host pool size’ is specified as 10, Autoscale will ensure a minimum of 1 (10%*10) session host is available to take user connections.
Lastly you will enter the minimum and maximum VMs to be part of a host pool.

7. The Peak hours tab lets you set at what hours you expect to have most user-load on your session hosts and how the users should be load balanced (Breadth-first distributes sessions equally on available hosts while Depth-first fills one host with allowed sessions defined in the host pool settings before moving to the next host).

8. At Ramp-down you will enter values for when your host pool usage drops off.
Here you also have a choice to forcibly sign out users and to send a notification message. By entering a Virtual Machine limit you will ensure to always have some hosts available.

9. The last tab, Off-peak hours works similar to Peak hours and lets you choose a time when Ramp-down period stops and what load balancing to use during this period. Klikk Add to create the schedule and Next to assign the schedule to host pools.

10. Next you will assign this scaling plan to the host pool(s) of your liking. Add the tags you need and when you are done; click Review+Create Note: Each host pool can only have one scaling plan assigned to it.

Conclusion
Autoscale is a powerful feature that can help you optimize your Azure Virtual Desktop environment, ensuring that you have the right resources at the right time while keeping costs under control. Whether you choose power management autoscaling or dynamic autoscaling, implementing autoscale can lead to significant improvements in both performance and cost-efficiency.
If you need more flexible automation features, including user driven, multiple auto-scale triggers, insights and storage management, I recommend you to take a look at Nerdio Enterprise Manager: Enable Dynamic Host Pool Auto-scaling – Nerdio Manager for Enterprise
